If you’re a boating enthusiast or marine DIYer looking to upgrade your power system, switching to a lithium battery setup can be a game-changer. Lithium batteries offer superior energy density, longer cycle life, and lighter weight compared to traditional lead-acid batteries—making them perfect for marine applications where space and weight are at a premium.
In this walkthrough, we’ll guide you step-by-step through setting up your own marine lithium battery system safely and effectively.
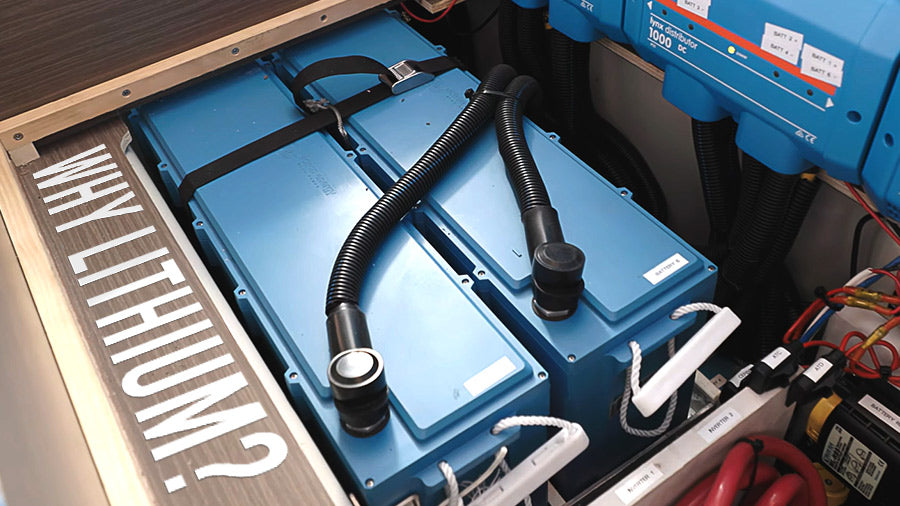
Why Choose Lithium for Marine Use?
-
Lightweight: Lithium batteries weigh about half as much as lead-acid alternatives.
-
Long Life: You’ll get 2-3 times more charge cycles, meaning fewer replacements.
-
Higher Efficiency: Faster charging and deeper discharges without damage.
-
Maintenance-Free: No need to top off water or check acid levels.
-
More Usable Capacity: You can safely use up to 80-90% of the battery capacity.
Step 1: Plan Your Battery Bank
Determine your power needs:
-
Calculate total watt-hours required for your boat’s systems.
-
Decide on the voltage (12V, 24V, or 48V) based on your equipment.
-
Choose battery capacity (Ah) accordingly.
Remember: Lithium batteries come in various sizes and chemistries, but LiFePO4 (Lithium Iron Phosphate) is the safest and most popular choice for marine use.
Step 2: Select Quality Components
-
Batteries: Pick marine-grade LiFePO4 batteries with built-in Battery Management Systems (BMS).
-
Battery Management System (BMS): Protects cells from overcharge, over-discharge, and temperature extremes.
-
Charger: Use a charger compatible with LiFePO4 chemistry.
-
Inverter/Charger: If you need AC power onboard, select one rated for your system voltage.
-
Cables & Connectors: Use marine-grade, appropriately gauged wiring and secure terminals.
Step 3: Prepare the Installation Area
-
Ensure a dry, ventilated, and secure compartment.
-
Batteries should be mounted firmly to prevent movement.
-
Maintain easy access for inspection and maintenance.
-
Avoid exposure to extreme heat.
Step 4: Wiring Your Battery Bank
-
Follow the manufacturer’s wiring diagrams carefully.
-
Connect batteries in series or parallel to achieve desired voltage and capacity.
-
Use proper fusing near the battery terminals to protect wiring.
-
Make all connections tight and corrosion-resistant—consider using anti-corrosion sprays or heat shrink tubing.
-
Double-check polarity to avoid damaging the system.
Step 5: Connect to Charger and Load
-
Install your charger according to instructions.
-
Connect your loads (lights, pumps, electronics) to the battery bank.
-
If you have solar panels or alternators, integrate charge controllers compatible with lithium batteries.
Step 6: Testing and Monitoring
-
Power up the system and verify voltage readings.
-
Use a battery monitor or smart app if available to track state of charge and health.
-
Test all systems for proper operation.
-
Keep an eye on temperature and voltage during first few charge/discharge cycles.
Safety Tips
-
Always wear protective gear when handling batteries.
-
Disconnect all power before working on wiring.
-
Avoid short circuits and sparks near batteries.
-
Store batteries away from flammable materials.
-
Follow all manufacturer guidelines.
1 comment
Just purchased a 12 v 460 essential epoch for an additional battery bank on my boat. I currently have 4 epoch 12 v 100 amp batteries hooked up in parallel for my main bank , but with the Black Friday sale thought I’d create a second house bank for longer stays on the hook. I need to incorporate a “T” fuse close to the positive terminal that will handle the potential AIC arc from the 460 amps , if the battery goes sideways past the BMS. My boat has minimal electrical needs , so I only am using a 225 amp “T” fuse for the current house bank. I fused each battery with a MRBF @ 125 amps and then to a buss bar and on to the house fuse. I plan on keeping the banks separate with on /off switches for each line to the 225 amp house fuse. What would be a sufficient fuse holder for this application?
Cheers J.T.